This is the second in a series of blog posts describing the process I undertook to recreate the child-sized coat armour on display at the Musée des beaux arts in Chartres, France. I’ll be covering the process of drafting the pattern. Find the first part here: Dyeing an Imperfect Lampas.
When I examined the coat in the museum in Chartres on July 1, 2011, my first order of business was to take a myriad of measurements. I gave careful thought to all of the lengths I would need to recreate the pattern on flat paper later. I laid them out in a spreadsheet before going to France. My best friend, Greta, accompanied me as my assistant and recorded them for me as I measured and called out each number to her. Time was short. I was only given three hours to gather all the data I would ever get from this coat.
Here are the measurements I took. Each number corresponds to a measurement on the following tables.

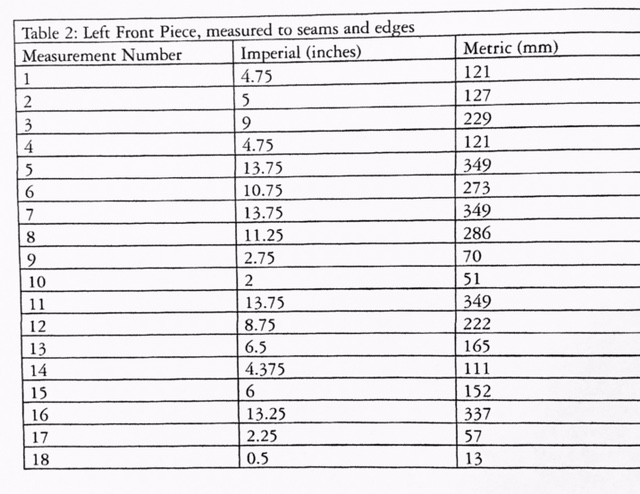
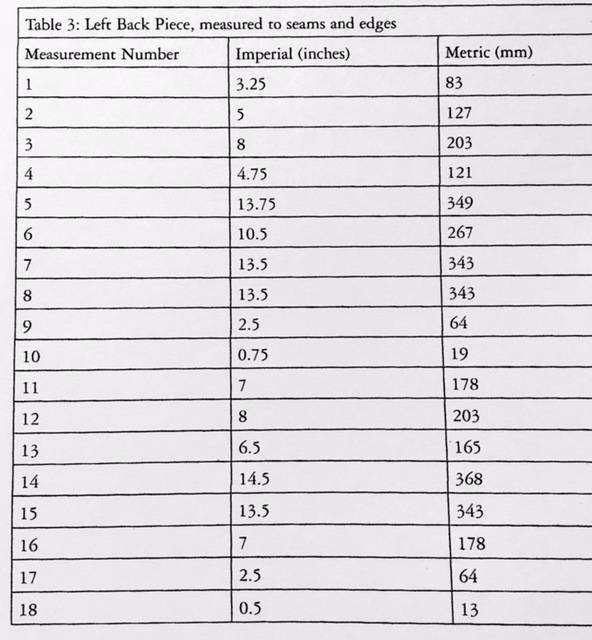

This may seem like an excessive number of measurements, but without them, I couldn’t be certain I was accurately reproducing the flat pattern. It’s probable that with fewer measurements I would have been forced to fudge some aspects of the pattern from memory. This way, I could be confident.
I framed out the shapes of the torso pieces using straight lines crossing each other (an x and y axis) as a guide. I was delighted to discover a beautiful symmetry at play. The waist ran exactly midway between the highest point of the shoulder and lowest point of the hem. The torso pieces could also be bisected by a line that ran from the highest point of the shoulder, directly down the middle of each piece.
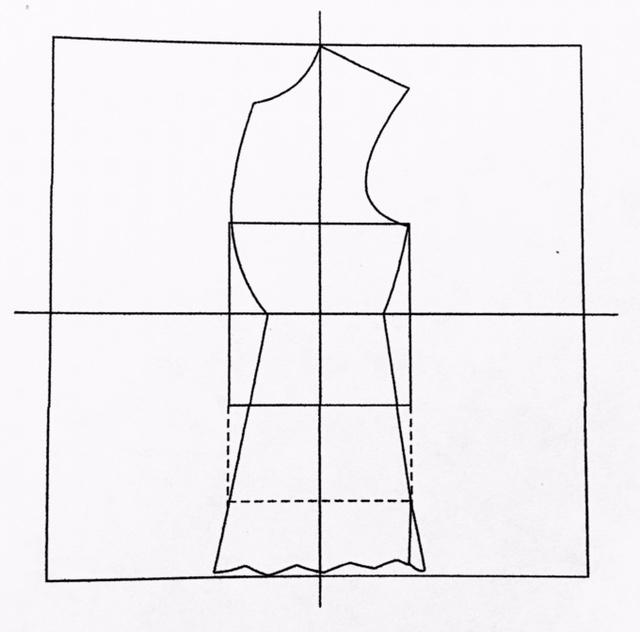
Note the chalice shape framed by the square in the middle of the diagram above. We frequently think of an hour-glass shape when describing the fashionable silhouette of the 14th century. This certainly applies for women. For men, however, I think a chalice shape describes the silhouette better, especially in the last 40 years of the century. Their chests were framed with bold curves, but their hips less so. The lower half of the torso was more typically defined by an A-line. In the most fashionable clothing, this A-line was enforced with the use of rigorous padding and quilting.
That straight-line flare from the waist to the hips was made all the more striking by placing the waist artificially high. The dotted line extension in the diagram above shows where the bottom of a man’s hips would end. The waist on a man typically sits about halfway between the armpits and the bottom of the hips. Here, the waist has been placed about one third of the distance between armpits and the bottom of the hips. Modern re-creations typically place the waist too low to give the correct silhouette.
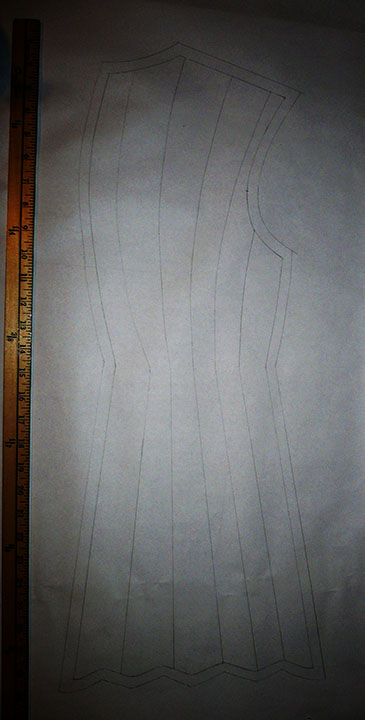
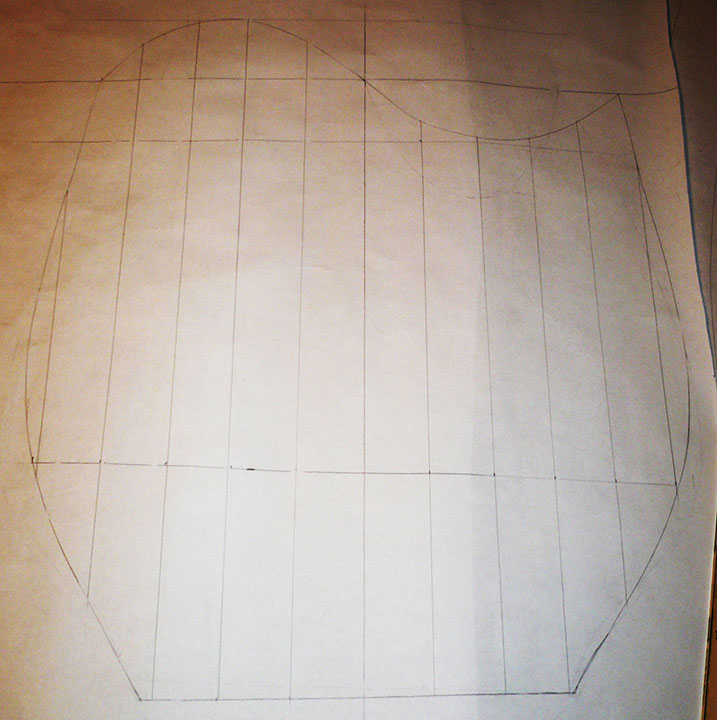
Analysis of period silhouettes aside, I drafted the pattern using pencil, wide craft paper, ruler, yard stick, a flexible curve ruler and—of course—the measurements. Here is an example of the back piece in progress:

In addition to re-creating the pattern shapes, I had the added challenge of re-creating the placement of the quilt lines. The curator at the Musée des beaux arts took photos at my request, which I consulted when placing the quilt lines. As you can see in the picture above, the quilt lines were not uniform or parallel.
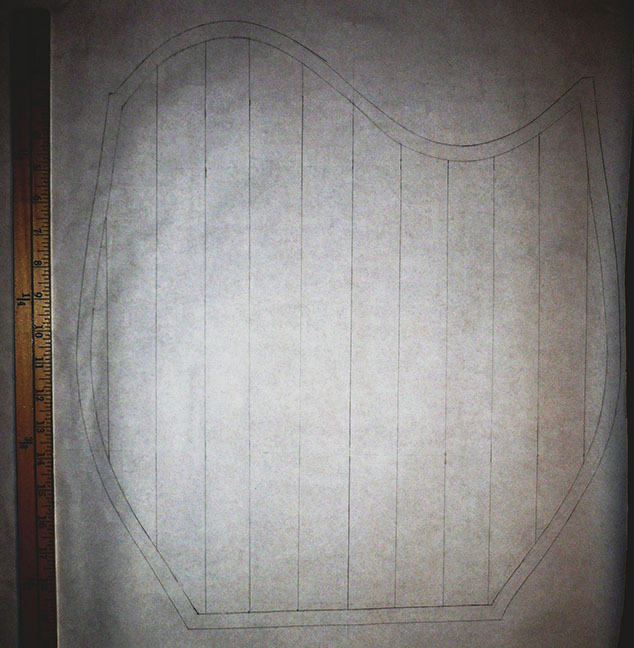
Apologies for the dark photo. I did not have a decent camera at the time. As you can see, I added a half-inch of seam allowance all around. See how the quilt lines do not line up with all the hem scallops? It’s clear that the maker was not concerned with that sort of neatness. Far more important was the emphasis on the waist. The lines move inward proportionately, and then back out again, once past the waist.
Here’s a photo of the front piece before I added the hem scallops and seam allowance:

The quilt lines are complex and somewhat unpredictable. Some curved more strongly than others, and the curves themselves were all slightly different.

The sleeve was quite straight-forward. It had a somewhat shallow s-curve sleeve cap, which allowed the curved seam to run down the back of the arm and provide a fullness for the elbow to bend into.
The finished sleeve pattern’s quilt lines were much easier to map out than the body pieces’ quilt lines—straight lines that run parallel to each other are the easiest of all.
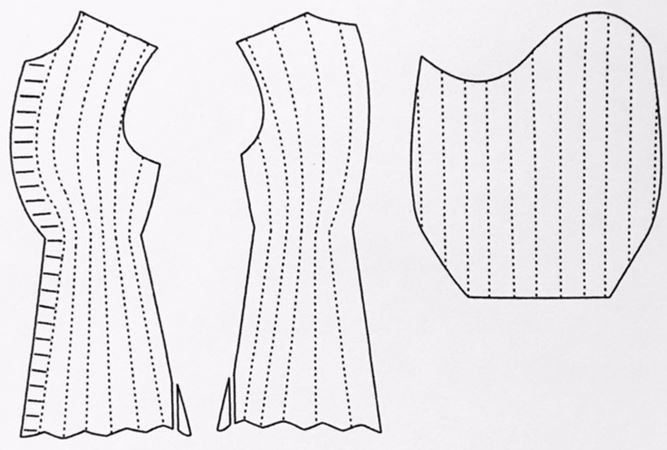
The cleaned-up pattern, including tiny godets on the side seams, finally emerged. For the purpose of reproduction, I decided to incorporate the tiny godets in the main pattern pieces. They existed on the original because the original, lengthwise-folded fabric was not wide enough to accommodate the full width of the skirt for cutting purposes.
I also mapped out the shape of the padded placket which sits behind the buttonholes on the original coat:

Clearly plackets were a done thing, because this is not the only extant garment from the time period with one. The jupon preserved with the Black Prince’s funerary achievements (dated to 1376) in England also has a placket behind its lacing holes. See Janet Arnold’s article (citation below) for a good source of information on the jupon.
The final step in preparing this pattern was to treat the pattern pieces like stencils. Instead of cutting the fabric into the shape of the finished pattern pieces, I was going to lay these stencils on rectangles of linen fabric and then transfer the final shapes as well as the quilting lines. I planned to use the prick-and-pounce method for the transfer. These large rectangles of linen would serve as the base upon which I would build the padding and quilting.

In the next installment, I’ll show you how I padded and quilted the garment pieces before sewing them all together. (Part 3: Padding and Quilting on a Frame)
Suggested Reading:
Arnold, Janet. “The Jupon or Coat-Armour of the Black Prince in Canterbury Cathedral.” Journal of the Church Monument Society VIII (1993): 12–24.
Kelly, Tasha D. “The Tailoring of the Pourpoint of King Charles VI of France Revealed”. Waffen- und Kostümkunde Hefte 2 (2013): 153–180.